Note: If you just want to install Hyper TT build onto Kodi please skip to Step 4
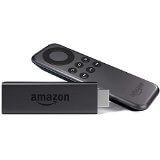
Step 1: If you haven’t already, purchase an Amazon Fire TV Stick
An Amazon Fire TV Stick is what we will be installing Kodi onto to get all of our free channels, movies and sports etc. It is available from Amazon as well as many other online and local stores. To purchase an Amazon Fire TV Stick from Amazon, please Click Here.
Step 2: Installing Kodi onto the Amazon Fire TV Stick
Getting Kodi installed onto your Amazon Fire TV Stick may seem daunting at first, but you will most likely only need to do this once and you will then be setup with FREE, unlimited access to all premium channels.
To Install Kodi on a FireStick, please do the following:
- Download the latest Kodi APK file for your Amazon Fire Tv Stick by clicking here – Save this file onto your computers desktop so that it can be easily found later on.
- Turn your Amazon Fire TV Stick on
- Select Settings
- Select System
- Select Developer Options
- Select Apps from Unknown Sources and turn ON & Select ADB Debugging & turn ON.
- You will be presented with a message regarding unknown sources.
- Simply click OK as this is needed to install Kodi onto your Amazon Fire TV Stick.
- Now we need to find the IP Address of your Fire Stick so that we can install the Kodi Application.
- Select Settings
- Select System
- Select About
- Select Network and make a note of the IP Address, this is the IP Address of your Amazon Fire TV Stick.
- Once you have enabled Apps from Unknown Sources, turned on ADB Debugging and made a note of your Firesticks IP Address we now need to download and install a free program called adbLink, below are the links to download it for your relevant operating system:
- Once you have downloaded and installed adbLink open it
- Select New
- In Description give your Amazon Fire TV Stick a name
- In Address type the IP you made a note of earlier & select Save
- Now Select Connect
- The IP Address of the Amazon Fire TV Stick will now be listed in Connected Devices
- Select Install APK
- Navigate to the desktop of your computer to find the Kodi APK we downloaded earlier.
- When prompted if you would like to install the APK. Select Yes.
- A little notification in the bottom right of the window will indicate the progress of the Kodi installation on your Amazon Fire TV Stick.
- You will get an Installed notification when complete – Congratulations! You have now done the hardest part.
Step 3: Launching Kodi on your Amazon Fire TV Stick
Now that Kodi has been installed on to your Amazon Fire TV Stick it can be accessed/opened by going to:
Settings > Applications > Manage Installed Applications > Kodi > Launch Application
Once you have opened Kodi for the first time on your Amazon Fire TV Stick give it a minute or so to finish its initial loading, once that is done we are ready to move onto the final step, getting our FREE content!
Step 4 (Final step!): Launching Kodi and setting up your unlimited FREE channels
To gain access to all of our FREE unlimited live channels, movies, sports etc we are going to be installing a Kodi build addon called “Hyper TT” which was made by Top Tutorials
This addon will give us access to all of the premium content completely FREE and unlimited.
To install the Hyper TT build please do the following:
- Make sure you have Kodi open on your Amazon Fire TV Stick
- Scroll over to System
- Underneath System select File Manager
- Scroll down to Add source and select it
- A popup box will appear, hover over where it says and then select it
- A text entry box will then appear, please enter the following: http://tdbrepo.com/repo/ Once done, please select Done
- Where it says Enter a name for this media source click into the box and give it a name you will recognise e.g. Hyper TT
- Now click OK and press back on your Amazon Fire TV Stick remote until you are back at the main Kodi screen again.
- Scroll over to System and then underneath select Settings
- Scroll down to where it says Add-ons and select it.
- Now scroll down to Install from zip file and select it, you will now see a list of locations, find the source name we just added and select it.
- You will see a zip file with the name starting as repository.echo, simply click on this.
- You will get a notification on the bottom left saying that the ECHO repository has been installed.
- Now press Install from repository, find the ECHO repository and then press it.
- Scroll down and select Program add-ons
- Now scroll down to ECHO Wizard and select it and press Install.
- You will then get a notification saying the ECHO Wizard has been installed.
- Select the ECHO Wizard again and this time click Open.
You are now just a few minutes away from completing the setup
- Inside the ECHO Wizard you have just opened, scroll down to Community Builds and select it.
- Look for the Top Tutorials option in this list and select it.
- You will see a notice about using community builds, simple press back on your Amazon Fire TV Stick remote to get rid of this message.
- Now simply go down the list and select either “Hyper TT” or “Hyper TT Firestick Edition” depending on the device you are installing this on, and then select Download This Build Now and follow the steps shown on screen.
- Your Hyper TT build will now automatically download and install, once it has finished installing give it a minute for all of the add-ons to finish updating and then you are done!
Enjoy your unlimited FREE content!
The rest is quite self explanatory, simply use your Amazon Fire TV Stick to select what you require e.g. MOVIES, TV SHOWS, SPORTS and then have a look through the different addons available to find what you need.
We also recommend a fast, secure and unlimited VPN which you can get by clicking below, this will protect your privacy and give you the fastest Kodi speeds with no buffering:
If you have any questions, please comment them down below 🙂


